Friday, March 21, 2014
Labels:
packet analysis
,
Wireshark


Since the packet details are structured according to layer-specific information, I can quickly expand a collapsed section related to the target of my search. Pro-tip: this is where understanding networking and application behavior is really helpful. Don't worry if you're not familiar, because this is also what helps you learn how the packets are placed onto the wire. Let's dive into this one layer at a time.
What's funny about this part of the packet view is that if you take away the bracketed lines, there's not much info left! Interface ID, Encapsulation Type, Arrival Time, Epoch Time, Frame Number, Frame Length, and Capture Length. I'm still learning, of course, but what I've found is the most important is the Frame Number. When troubleshooting a network communication issue, it's extremely helpful to guide someone else through the packet capture using the Frame Number as a point of reference.

With or without expanding the Ethernet header, we can see the source MAC address and destination MAC address. This is handy when troubleshooting an outbound packet, because you can see where the packet was destined to reach. Typically, this destination MAC belongs to the default gateway, but it depends on the network topology.
What's nice in troubleshooting as well is that the first six hexadecimal digits are parsed by Wireshark to display the user-friendly NIC identifier, commonly referred to as the manufacturer's registered identification number. If you know your device, then you can easily recognize the packets sent and received by your device based on MAC. Why is this important? Load-balanced clusters that share a virtual IP address.

In the IP header, we see the source and destination IP addresses. When dealing with packets on WAN links, sometimes people utilize the DiffServ Code Point value (DSCP) as a Quality of Service mechanism to classify packets into prioritized buckets. Higher-priority packet buckets get processed first.

Focusing on the highlighted line in blue, we quickly see the source port and destination port. From those numbers, it's typically easy to recognize which is the sender and receiver. When a host sends a packet to another host, the port chosen on the source is a randomized ephemeral port higher than port 1024. The destination host in this case is a webserver, which makes sense since we're looking at an HTTP packet, and the destination port is 80 (the normal server port over which HTTP connections are established).
In the exploded view, we see the Flags section which indicates certain information related to the nature of the connection. For instance, the Push flag is set, which is an indicator that the packet should be processed up to Layer 7 because the source is sending data to the destination. In this packet, that data is the URL in the GET request. It's at this part of the packet attacks like the Christmas Tree attack are initiated against a webserver. This video explains it perfectly:

Expanding the HTTP layer, we see the formation of the GET request. Bonus points on my imaginary scoreboard if anyone can let me know in the comments whether the request is explicit or transparent. In the GET request, I can see the HTTP protocol version used (1.1) and the path of the request. The path in this packet is "/", meaning it was a request for the root web directory.
The Host Header instructs the server to send the root web directory back for www.msn.com. Can anyone guess why the Host Header is important? Think about it for a second, and then you can check your answer.
Below the Host Header, we can see other HTTP Request Headers the browser of the source host sent to the webserver. The ones to discuss are User-Agent, DNT, Accept, Accept-Encoding, and Accept-Language, but head on over to my HTTP Headers post if you're interested. In this here post, we're focusing on the packets!
At the very bottom of the HTTP layer of the packet, you can see some helpful bracketed information Wireshark parsed out for us. We can see the Full request URI, which means the request was observed as http://www.msn.com. And we see that the webserver responds to this packet [Frame 294, see above] in Frame 389. That allows you to scroll through the packet capture to Frame 389 to see what the server sent back.
Read More
Packet Analysis 101 - Wireshark's Packet Details
"The time has come," the Walrus said,You've already seen how to use Wireshark to take a packet capture, how to set capture filters, and how to set display filters. In this post, we're going to talk about Wireshark's Packet Details View.
"To talk of many things:
Of bits-and bytes-and frame headers--
Of trace routes-and pings...
Packet Details
What's nice about Wireshark's Packet Details View is that it parses out the packet in easy to read sections that map to the OSI model:Since the packet details are structured according to layer-specific information, I can quickly expand a collapsed section related to the target of my search. Pro-tip: this is where understanding networking and application behavior is really helpful. Don't worry if you're not familiar, because this is also what helps you learn how the packets are placed onto the wire. Let's dive into this one layer at a time.
Packet Frame Header
Let's expand the Frame Header line and see what we get.

Some important things to note first before we discuss too many details. When you expand a "layer" in the Packet Details View, anything in brackets is something not found in the actual packet, but is inserted by Wireshark during the loading of the packet capture. Fun stuff to note for later includes the time delta and coloring rule.What's funny about this part of the packet view is that if you take away the bracketed lines, there's not much info left! Interface ID, Encapsulation Type, Arrival Time, Epoch Time, Frame Number, Frame Length, and Capture Length. I'm still learning, of course, but what I've found is the most important is the Frame Number. When troubleshooting a network communication issue, it's extremely helpful to guide someone else through the packet capture using the Frame Number as a point of reference.
Ethernet Header (OSI Layer 2 - Datalink)
With or without expanding the Ethernet header, we can see the source MAC address and destination MAC address. This is handy when troubleshooting an outbound packet, because you can see where the packet was destined to reach. Typically, this destination MAC belongs to the default gateway, but it depends on the network topology.
What's nice in troubleshooting as well is that the first six hexadecimal digits are parsed by Wireshark to display the user-friendly NIC identifier, commonly referred to as the manufacturer's registered identification number. If you know your device, then you can easily recognize the packets sent and received by your device based on MAC. Why is this important? Load-balanced clusters that share a virtual IP address.
IP Header (Layer 3 - Network)
TCP Header (Layer 4 - Transport)
Because HTTP is a TCP-based protocol, we have a TCP header present.
Focusing on the highlighted line in blue, we quickly see the source port and destination port. From those numbers, it's typically easy to recognize which is the sender and receiver. When a host sends a packet to another host, the port chosen on the source is a randomized ephemeral port higher than port 1024. The destination host in this case is a webserver, which makes sense since we're looking at an HTTP packet, and the destination port is 80 (the normal server port over which HTTP connections are established).
In the exploded view, we see the Flags section which indicates certain information related to the nature of the connection. For instance, the Push flag is set, which is an indicator that the packet should be processed up to Layer 7 because the source is sending data to the destination. In this packet, that data is the URL in the GET request. It's at this part of the packet attacks like the Christmas Tree attack are initiated against a webserver. This video explains it perfectly:
HTTP (Layer 7 - Application)
At last, we see the application layer! This part of the packet can help us get a measure of what the source did and how the server may respond. In this packet we see HTTP, but in future posts we'll discuss other Layer 7 protocols and the communication involved.
The Host Header instructs the server to send the root web directory back for www.msn.com. Can anyone guess why the Host Header is important? Think about it for a second, and then you can check your answer.
Below the Host Header, we can see other HTTP Request Headers the browser of the source host sent to the webserver. The ones to discuss are User-Agent, DNT, Accept, Accept-Encoding, and Accept-Language, but head on over to my HTTP Headers post if you're interested. In this here post, we're focusing on the packets!
At the very bottom of the HTTP layer of the packet, you can see some helpful bracketed information Wireshark parsed out for us. We can see the Full request URI, which means the request was observed as http://www.msn.com. And we see that the webserver responds to this packet [Frame 294, see above] in Frame 389. That allows you to scroll through the packet capture to Frame 389 to see what the server sent back.
Conclusion
This post focused on a single HTTP packet and explained Wireshark's Packet Details View of that packet. If you have any questions or just want to let me know how awesome it was to read this post, please leave a comment below!
Labels:
headers
,
http
If you have questions about HTTP Host Headers, please let me know in the comments below!
Read More
HTTP Host Headers
Why are Host Headers important?
Host Headers are sent in the HTTP GET request to instruct the webserver to send content back for a specific website. This is necessary for webservers that host multiple websites (think shared hosting), so the hosting server can match the content to the Host Header and serve up what website.
Here's a video demonstrating multiple sites on a single IIS server and setting the associated Host Headers so the server knows which site to serve:
Check out how HTTP Host Headers look in a packet capture (scroll to the bottom).
If you have questions about HTTP Host Headers, please let me know in the comments below!
Wednesday, March 19, 2014
Labels:
CTF
,
maccdc


Read More
MACCDC 2014: Virtual Quals Lesson Learned
MACCDC 2014 - Virtual Qualifier Round
Some found my MACCDC 2013 write-up helpful, and more information is always better, so here's this year's lesson learned for the virtual qualifier round.
Choose a later time slot
This lesson is pretty subjective and I don't mean for it to sound negative or whiny, so please keep that in mind.
We chose one of the first time slots available this year in which to compete, and right after we were told "go!" we saw problems with the game infrastructure. The external IP addresses listed on the Flags tab were different than those listed on the Assets tab.
Here's a modified view of the Assets tab:
And here's the modified view of the Flags tab:
Struggling for Control
We connected to the external IP addresses on the Assets tab according to what team member was tasked to a respective system and tried to start the system hardening. Within the first 10 minutes, we noticed odd behavior that wasn't attributable to red team activity. We saw multiple sessions on Linux boxes and there were RDP battles on Windows. We then found out that our assets were swapped with those of another college! Once the game masters were aware of the issue, they started working on the fix.
In the mean time, all teams retained access to the systems to which they were connected. This meant that teams could still scour the systems to look for flag values to be submitted once the assets were re-aligned, as well as continue hardening their boxes. At this point, injects weren't assigned, so they weren't a concern.
Access Restored?
Once all machines were fixed in the scoreboard to be assigned to the correct teams, the games masters graciously reset the game clock. However, they did not reset the machines or the flags teams may have already captured. Of concern on that point is that according to the rules, whichever team submits flags first wins in the event of a tie. Well, with the start and end times now adjusted, we quickly went back to work.
Nope, Still Broken
Even after the game was reset, when we tried submitting flag values, they were not accepted by the scoreboard. The problem was that when you click on a flag to submit the value, although the main entry in the list was re-mapped correctly, the pop-up flag submission prompt still reported the old system. We had to take screen caps to prove what we were saying, as the game masters didn't believe us.
Conclusion
Now that you have a sense of the issues we were facing, I would recommend not choosing an initial time slot for fear of the game infrastructure being "buggy". The thought process behind this is that if your team chooses a later slot, then maybe by then the issues will be resolved and the game experience will be smooth. From a practical perspective, the time spent having to converse with the game masters about what is broken and why takes away time from your focus on system hardening, etc.
Something we found interesting is that not a single team from our round progressed to regionals...
Tuesday, March 18, 2014
Labels:
CTF
,
maccdc
Read More
MACCDC 2014: Sahana Eden Write-Up
This year, I was tasked to a linux box, even though my greater strength is in Windows. With the theme of this year's MACCDC being related to disaster recovery, I discovered the distro I had was Sahana Eden.

The tl;dr of this part is that I recommend once you learn of the MACCDC theme, look for related open-source linux distros (virtual appliances). Download a couple and mess around with them. Who knows, you might get lucky and pick the actual distro used in the qualifiers. At best, it will save you time once the competition starts and at worst you'll still learn to navigate your way around a linux box if you already aren't familiar.
What am I getting myself into?
Sahana Eden is, from their description:
... an Emergency Development ENvironment platform for rapid deployment of humanitarian response management. Its rich feature set can be rapidly customized to adapt to existing processes and integrate with existing systems to provide effective solutions for critical humanitarian needs management either prior to or during a crisis.If you'd like to download it yourself for experimentation, click here.
The Sahana Eden distro has webmin running by default, which coincidentally was a monitored service by the scorebot. Webmin, if you're not familiar (because I'd never seen it before!) is a web-based linux administration portal. By default, it was only accessible from internal addresses so you could only access it on the local host itself or from another asset. I debated trying to modify the configuration files to make it externally accessible, but since our Active Directory guy had his system set already I used his box to look at the webmin portal for anything useful. One less external vector for the red team, right? Since I'd never seen it, I originally assumed it was the web-app itself. Once I figured out that it wasn't, I was able to re-focus my attention on getting Sahana Eden up and running.
Sahana Eden Administration
First, let me say that the Sahana Eden documentation in terms of administration is not something you want to have to weed through during competition time, because the paths listed on the turnkeylinux site and the wiki are confusing and potential time-wasters.
The screenshot for Sahana Eden administration shows it being accessible via Web2Py:
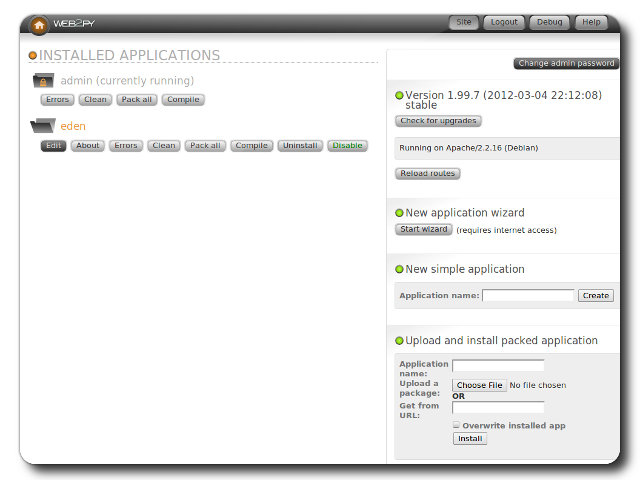

The screenshot for Sahana Eden administration shows it being accessible via Web2Py:
To clarify though, this isn't really web-app administration in the sense of application-specific settings. It's more about installing the eden app itself. So where then do you go to manage the app? Many web-apps have an administration portal off the customer-facing component, which is accessible after you log in. The customer-facing portal of Sahana Eden looks like this:
According to the turnkey linux page:
first registered user will become the administrative user account
Seems simple, right? Riiiiiiiight... Attempting to create a user resulted in a database error. That means I need to fix the database issue before I can register a user so that I can get into the web-app!
Sahana Eden's DBMS
By default, when you launch the /var/www/web2py main script, you'll see a note in the loading banner that unless otherwise specified in the config files the database management system will be sqlite3. When I checked, sqlite wasn't installed, hence the failure.
I did notice however that mysql was installed, and it happened to have an empty eden database. My guess is that the distro has the eden database in mysql preset via the web2py console. The questions then are: (1) how to point the web2py config files to use mysql instead of sqlite3, and (2) how to populate the database with what's necessary to create the admin account.
To save time, just go to the Wiki's Virtual Machine Installation Guide and scroll down to the Next Steps section. We need to modify two files:
web2py/applications/eden/models/000_config.py
web2py/applications/eden/models/zzz_1st_run.py
The config.py file has all settings necessary to point web2py to use the mysql instance, so you can make the necessary changes there (NOTE: I backed up the existing file first to have something to revert to).
The 1st_run.py file will generate the tables, etc. in the mysql instance.
After re-launching web2py, the app will now be pointed to an installed DBMS and allow you to create the user, so you can then take a look around at the app and maybe complete an inject or two. wink, wink
Good Luck!
Subscribe to:
Posts
(
Atom
)


